
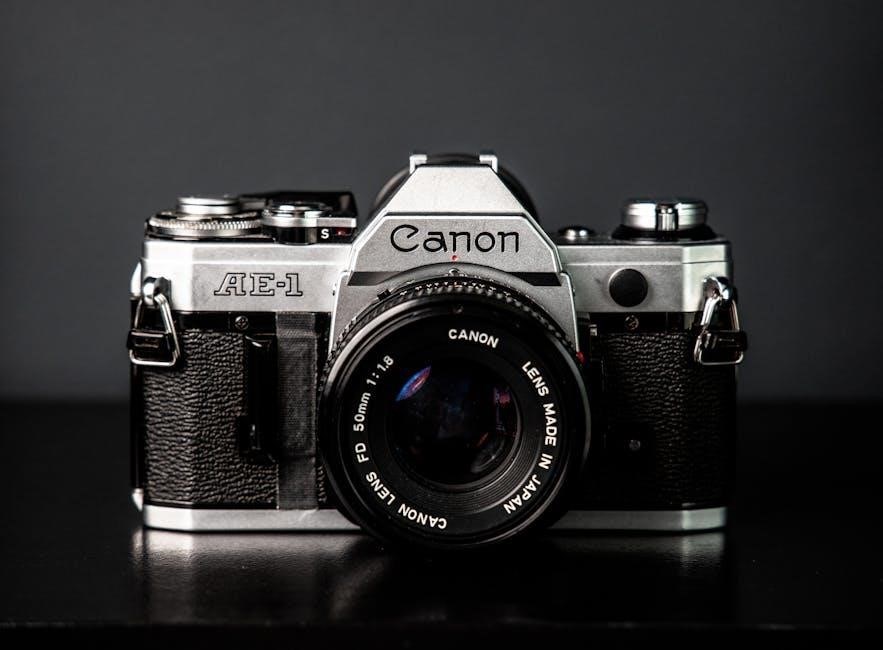
canon ae 1 camera manual
The Canon AE-1, released in 1976, quickly became a favorite among photographers, blending accessibility with robust features․
This iconic 35mm SLR offered a user-friendly experience, making it ideal for beginners while still appealing to experienced enthusiasts․
Its popularity stems from its innovative automatic exposure modes and durable construction, ensuring a lasting legacy in film photography․
The camera’s manual simplifies setup and use with clear instructions and illustrations, a testament to Canon’s commitment to user satisfaction․
The AE-1’s design prioritized compactness and ease of handling, contributing to its widespread adoption and enduring appeal within the photographic community․
Understanding the camera’s capabilities, as detailed in its manual, unlocks a world of creative possibilities for both novice and seasoned photographers alike․
What is the Canon AE-1?
The Canon AE-1 is a 35mm single-lens reflex (SLR) film camera produced by Canon from 1976 to 1984․ It represents a pivotal moment in Canon’s history, marking their entry into the increasingly popular market of automatic exposure cameras․
Distinguished by its electronic shutter and microprocessor control, the AE-1 offered photographers a range of shooting modes – Shutter Priority, Aperture Priority, and Programmed AE – providing flexibility and convenience․ The camera’s manual details these modes extensively․
It was Canon’s newest SLR, designed to be smaller and lighter than many of its contemporaries, without sacrificing functionality․ The AE-1’s success was largely due to its user-friendly design and the availability of a wide range of Canon FD lenses․
The camera’s manual serves as a comprehensive guide, simplifying configuration and operation with clear instructions and illustrative diagrams, making it accessible to both beginners and experienced photographers․ It’s a testament to Canon’s dedication to providing a quality photographic experience․
Why is the Canon AE-1 Still Popular?
Despite being discontinued decades ago, the Canon AE-1 maintains a strong following among film photography enthusiasts․ Its enduring popularity stems from a combination of factors, including its robust build quality and accessible design, thoroughly explained in the camera’s manual;
The AE-1’s automatic exposure modes – shutter priority, aperture priority, and programmed AE – simplified the shooting process, making it appealing to beginners․ The manual provides detailed guidance on utilizing these features effectively․
Furthermore, the extensive Canon FD lens system offers a wide range of creative possibilities․ The camera’s relatively affordable price point on the used market also contributes to its accessibility․
Online communities and readily available resources, including downloadable PDF manuals, ensure continued support and knowledge sharing․ The AE-1 represents a tangible connection to a simpler, more deliberate approach to photography, resonating with those seeking an alternative to digital imaging․
Understanding the Camera Body
The Canon AE-1’s body houses essential components, detailed in the manual, for film loading, battery installation, and operation․
Familiarizing yourself with these elements is crucial for successful shooting and camera maintenance․
Key Components and Their Functions
The Canon AE-1 features several key components, meticulously explained within the camera’s manual, each serving a vital function․ The shutter speed dial, located on top, controls the duration of light exposure, ranging from 2 seconds to 1/1000th of a second․ Adjacent to it, the ASA/ISO setting ring adjusts the camera’s sensitivity to light, crucial for matching film speed․
The film advance lever, when wound, advances the film and simultaneously cocks the shutter․ The rewind crank retracts the exposed film back into the cassette․ The viewfinder provides a clear view of the scene, incorporating a microprism collar for precise focusing․ The depth-of-field preview lever allows visualization of the in-focus area at the selected aperture․
The shutter button initiates the exposure process, while the film counter displays the number of frames shot․ The battery compartment, accessed from the bottom, houses the necessary power source for the electronic functions․ Understanding these components, as detailed in the manual, is fundamental to mastering the AE-1’s capabilities․
Film Loading and Unloading
The Canon AE-1’s film loading process, clearly outlined in the manual, begins by opening the camera back via the film rewind knob․ Insert a new 35mm film cassette into the film chamber, ensuring it seats correctly․ Pull the film leader across the camera body and thread it onto the take-up spool; Advance the film using the film advance lever, checking that the sprocket holes engage properly․
Continue advancing the film until the rewind knob begins to rotate, indicating the film is securely attached to the take-up spool․ Close the camera back firmly․ To unload, press the film rewind button on the camera bottom and turn the rewind knob in the direction of the arrow until the film is fully retracted․ Open the camera back and remove the film cassette․
Proper film handling, as detailed in the manual, prevents damage and ensures optimal image quality․
Battery Installation and Types
The Canon AE-1 requires a 4LR44 or equivalent 6V battery to power its electronic functions, including the light meter and shutter speed display․ The battery compartment is located in the camera base․ To install, slide open the battery compartment cover and insert the battery, observing the correct polarity (+ and -) as indicated inside the compartment․ Ensure the battery is securely seated․
The camera manual emphasizes using a fresh battery for accurate metering and reliable operation․ Alkaline or silver-oxide batteries are recommended for optimal performance․ Avoid mixing old and new batteries․ Regularly check the battery level using the viewfinder indicator; a dim or absent indicator signals the need for replacement․
Proper battery installation, as described in the manual, is crucial for the camera’s functionality․
Exposure Modes Explained
The Canon AE-1 offers shutter priority, aperture priority, and programmed AE modes, providing versatile control over exposure settings․
The camera manual details how each mode allows photographers to prioritize either shutter speed or aperture for creative effects․
Shutter Priority AE Mode
In Shutter Priority AE mode, the photographer selects the desired shutter speed, and the Canon AE-1 automatically sets the appropriate aperture for correct exposure․ This mode is exceptionally useful when capturing fast-moving subjects, like sports or wildlife, where freezing motion is paramount․ The camera’s manual clearly explains how to set the shutter speed dial to the ‘Tv’ position, allowing full control over motion blur or sharpness․
The AE-1’s metering system then calculates the optimal aperture to achieve a properly exposed image, ensuring that the selected shutter speed is maintained․ This is particularly beneficial in dynamic lighting situations where consistent shutter speed is crucial․ Remember, both shutter-speed priority AE and programmed AE require the correct setting, as noted in the manual․ The camera will then automatically adjust the diaphragm accordingly, providing a balanced exposure based on your chosen shutter speed․
Aperture Priority AE Mode
Aperture Priority AE mode on the Canon AE-1 empowers photographers to control depth of field, while the camera automatically determines the correct shutter speed for proper exposure․ Setting the aperture ring on the FD lens to the desired f-stop, and switching the camera dial to ‘Av’, activates this mode․ This is ideal for landscape photography, where maximizing depth of field is essential, or portraiture, where a shallow depth of field isolates the subject․
The camera’s metering system intelligently calculates the necessary shutter speed to achieve a well-exposed image based on the selected aperture and lighting conditions․ The manual details how the camera provides automatic diaphragm control, allowing you to set the desired shutter speed while the camera adjusts the diaphragm․ This mode offers a balance between creative control and automated convenience, simplifying complex exposure scenarios․
Programmed AE Mode
Programmed AE mode on the Canon AE-1 represents the camera’s fully automatic setting, where both aperture and shutter speed are determined by the camera’s internal metering system․ Selecting ‘P’ on the mode dial relinquishes control to the camera, making it exceptionally user-friendly for quick snapshots or situations where precise settings aren’t critical․ The manual notes that both shutter-speed priority AE and programmed AE require a specific setting for optimal function․
This mode is particularly useful in rapidly changing light conditions, as the camera continuously adjusts settings to maintain proper exposure․ While offering convenience, it provides less creative control than Aperture Priority or Shutter Priority modes․ The camera prioritizes a balanced exposure, suitable for general photography․ Understanding this mode, as outlined in the manual, allows photographers to leverage the AE-1’s automation capabilities effectively․

Focusing and Metering
The Canon AE-1’s manual details focusing techniques and the camera’s metering system, crucial for sharp, properly exposed images․ Mastering these elements unlocks creative potential․
Focusing Techniques with the AE-1
The Canon AE-1’s focusing relies on manual operation, demanding practice and a keen eye, as detailed within the camera’s manual․ The viewfinder provides a split-image focusing aid, where two slightly offset images converge when the subject is in sharp focus․ This method is particularly effective in good lighting conditions․
For lower light, or when focusing on subjects with low contrast, the manual suggests utilizing the microprism collar surrounding the split-image․ This collar creates a shimmering effect when the subject is out of focus, becoming clearer as focus is achieved․ Consistent practice with both methods will enhance your focusing accuracy․
Remember to consider depth of field – the area in acceptable focus – which is influenced by aperture settings․ The manual explains how to utilize the depth-of-field preview lever to visualize this effect before taking the shot․ Precise focusing, combined with understanding depth of field, is key to achieving professional-looking results with the AE-1․
Understanding the AE-1’s Metering System
The Canon AE-1 employs a center-weighted averaging metering system, as thoroughly explained in the camera’s manual․ This means the meter prioritizes the light levels in the center of the frame when calculating exposure․ The viewfinder displays a needle indicating exposure, with a “+” signifying overexposure and a “-” underexposure․
The manual details how to adjust shutter speed or aperture until the needle centers, achieving proper exposure․ Remember that the AE-1 offers various automatic exposure modes – shutter priority and aperture priority – where the camera selects one setting based on your input․ Understanding how the meter responds to different scenes is crucial․
The manual also cautions that strongly backlit scenes or subjects with high contrast can sometimes mislead the meter․ In such cases, employing exposure compensation or manually overriding the automatic settings may be necessary to obtain the desired results․
Using the Viewfinder
The Canon AE-1’s viewfinder is central to accurate focusing and exposure․ As detailed in the manual, it presents a bright, clear view of the scene, incorporating essential information for photography․ A microprism collar surrounds the central focusing spot, aiding in precise focus achievement – it becomes blurry when out of focus․
Crucially, the viewfinder houses the exposure needle, indicating whether the scene is underexposed (-) or overexposed (+)․ Aligning this needle to the center mark ensures proper exposure in automatic modes․ The manual explains how to interpret these readings alongside the selected exposure mode․
Additionally, the viewfinder displays the shutter speed currently set, even in automatic modes․ Familiarizing yourself with these elements, as outlined in the manual, is key to mastering the AE-1 and consistently capturing well-exposed, sharply focused images․
Advanced Features
The Canon AE-1 manual details depth of field control, external flash usage, and multiple exposure techniques for creative exploration․
These features empower photographers to transcend automatic settings and achieve unique artistic visions with this versatile camera․
Depth of Field Control
The Canon AE-1 manual explains depth of field as the range of acceptable sharpness in a photograph, controlled by aperture settings․ A smaller aperture (higher f-number like f/16) increases depth of field, bringing both foreground and background into focus – ideal for landscapes․ Conversely, a larger aperture (lower f-number like f/2․8) creates a shallow depth of field, isolating the subject with a blurred background, perfect for portraits․
Understanding this relationship is crucial for artistic control․ The manual details how to visually estimate depth of field using the lens markings and viewfinder․ Experimenting with different apertures allows photographers to emphasize specific elements within the scene and create visually compelling images․ Mastering depth of field transforms snapshots into deliberate artistic statements, showcasing the photographer’s intent and vision․ The AE-1’s manual provides clear guidance for achieving these effects․
Using External Flash
The Canon AE-1 manual details how to utilize external flash units for enhanced lighting control․ The camera’s hot shoe allows for direct connection, enabling synchronization with compatible flashes․ The manual emphasizes the importance of flash exposure compensation, adjusting the flash output to achieve proper illumination in various shooting conditions․
It explains how to use both automatic and manual flash modes, offering flexibility for creative lighting․ Automatic mode relies on the camera’s metering system to calculate the appropriate flash power, while manual mode grants full control over the flash output․ The manual also covers techniques like bouncing flash to soften shadows and using diffusers for more even illumination․ Proper flash usage, as outlined in the manual, significantly expands the AE-1’s photographic capabilities, especially in low-light scenarios․
Multiple Exposures
The Canon AE-1 manual explains how to create multiple exposures, a technique allowing several images to be superimposed onto a single frame of film․ This is achieved by utilizing the camera’s rewind release mechanism, preventing film advance after each exposure․ The manual details the precise steps for engaging and disengaging this feature, ensuring accurate layering of images․
It cautions users to carefully consider exposure compensation when creating multiple exposures, as each subsequent image adds to the overall light level․ Creative applications, such as ghosting effects or combining textures, are highlighted․ The manual suggests experimenting with different exposure combinations to achieve desired artistic results․ Mastering multiple exposures, as guided by the AE-1 manual, unlocks a realm of imaginative possibilities for photographers seeking unique and surreal imagery․
Troubleshooting Common Issues
The Canon AE-1 manual provides solutions for exposure, film advance, and shutter problems․ It guides users through diagnosing and resolving typical malfunctions, ensuring continued operation․
Exposure Problems
If your images are consistently over or underexposed, the Canon AE-1 manual suggests checking the battery first, as low battery power can affect metering accuracy․ Ensure the ASA setting on the camera matches the film’s speed; incorrect settings directly impact exposure calculations․
Verify the shutter speed and aperture settings are appropriate for the lighting conditions․ When using automatic modes, confirm the camera is correctly interpreting the scene․ If using shutter priority, double-check the selected shutter speed․ For aperture priority, ensure the chosen aperture provides sufficient light․
The manual also notes that certain lenses might exhibit slight metering variations․ Clean the contacts on both the lens and camera body to ensure proper communication․ If problems persist, consult the manual’s section on metering system checks for further diagnostic steps and potential solutions․
Film Advance Issues
If the film isn’t advancing, the Canon AE-1 manual advises checking if the film leader is properly engaged with the take-up spool․ Ensure the film is loaded correctly, following the diagram in the manual, and that the film is seated firmly against the pressure plate; A common issue is insufficient tension on the film as it’s being loaded․
If the film advances partially then stops, the manual suggests the take-up spool might be slipping․ Gently try to re-engage the film leader․ Avoid forcing the advance lever, as this could damage the mechanism․ Check for any obstructions within the film chamber․
The manual also details how to reset the film counter if it becomes misaligned․ If problems continue, consult the manual’s troubleshooting section for more detailed guidance and potential repair options․
Shutter Problems
According to the Canon AE-1 manual, if the shutter doesn’t fire, first verify the battery is correctly installed and has sufficient charge․ The AE-1 relies on electronic power for shutter operation․ Check the battery compartment for corrosion․ If the battery is good, the manual instructs to ensure the camera isn’t in Bulb mode, as this requires manual shutter release․

If the shutter fires intermittently, the manual suggests a potential issue with the solenoid or electronic circuitry․ Avoid repeatedly pressing the shutter button, as this could exacerbate the problem․ The manual cautions against attempting self-repair of these components․
The Canon AE-1 manual also details how to check the shutter speeds, and if they appear inaccurate, professional servicing is recommended․ Ignoring shutter issues can lead to further damage․
Lens Compatibility
The Canon AE-1 is primarily designed for Canon FD lenses, offering full functionality․ However, adapters exist for using non-FD lenses, as noted in the manual․
Using non-FD lenses may limit automatic diaphragm control, requiring manual adjustment․
Canon FD Lenses
Canon FD lenses were specifically engineered for the Canon AE-1 and other Canon SLR cameras utilizing the FD mount․ These lenses provide the most seamless and fully functional experience, enabling all automatic exposure modes and features of the camera․ The FD system offers a wide range of lenses, from standard prime lenses to versatile zoom options, catering to diverse photographic needs․
The manual emphasizes that optimal performance is achieved when using Canon FD lenses, ensuring accurate metering and automatic diaphragm control․ These lenses are characterized by their robust build quality and excellent optical performance, contributing to the overall image quality produced by the AE-1․ Different FD lenses are available with varying apertures and focal lengths, allowing photographers to select the ideal lens for their specific shooting scenarios․
Furthermore, Canon FD lenses are often readily available on the used market, making them an accessible and affordable option for AE-1 owners․ The FD mount provides a secure and reliable connection between the lens and the camera body, ensuring stable operation and consistent results․
Adapting Non-FD Lenses
While Canon FD lenses are ideal for the AE-1, adapters allow the use of lenses from other manufacturers and mounts․ However, the camera manual clearly states that automatic diaphragm control and certain automatic exposure modes are only fully functional with genuine Canon FD lenses․ Adapting non-FD lenses typically results in manual operation of the aperture, requiring the photographer to adjust it independently․
Using adapters can introduce limitations, such as reduced metering accuracy or the inability to utilize shutter-priority AE or programmed AE modes․ The manual cautions that compatibility and performance can vary significantly depending on the adapter and the lens being used․ Careful consideration should be given to the adapter’s quality and its potential impact on image quality and functionality․
Despite these limitations, adapters can expand the creative possibilities of the AE-1, allowing photographers to experiment with a wider range of lenses․ It’s crucial to research adapter compatibility and understand the resulting operational constraints before attempting to use non-FD lenses․
Resources and Further Learning
Accessing the Canon AE-1 manual in PDF format provides detailed guidance․ Online communities and forums offer valuable support, tips, and shared experiences with this camera․
Canon AE-1 Manual PDF Download
Locating a digital copy of the Canon AE-1’s official manual is incredibly beneficial for any user, new or experienced․ Several websites archive these essential resources, offering convenient access to detailed instructions and diagrams․
A PDF version allows you to easily search for specific functions, troubleshooting tips, or explanations of the camera’s various features․
The manual comprehensively covers everything from film loading and battery installation to understanding the different exposure modes and focusing techniques․
Downloading the manual ensures you always have a readily available reference guide, even when you’re away from a computer․
Many online resources provide links to downloadable PDFs, ensuring you can quickly find the information you need to fully utilize your Canon AE-1’s capabilities;
Having this manual at your fingertips empowers you to confidently explore the world of film photography with this classic camera․
Online Communities and Forums
Engaging with online communities dedicated to the Canon AE-1 provides a wealth of knowledge and support for users․ Numerous forums and groups are populated by experienced photographers eager to share their expertise and assist others․
These platforms are invaluable for troubleshooting issues, discussing techniques, and discovering new ways to maximize the camera’s potential․
You can find answers to specific questions, learn from others’ experiences, and even connect with fellow enthusiasts to share your work․
Many forums offer dedicated sections for the AE-1, covering topics like lens compatibility, repair advice, and film recommendations․
These communities often host discussions about the camera manual itself, clarifying complex concepts and offering alternative explanations․
Participating in these forums fosters a collaborative learning environment, enhancing your understanding and enjoyment of the Canon AE-1․